Introduction
Whether it's keeping warm air down for heat in the winter, or circulating cool air in the summer, a ceiling fan can cut energy costs and help keep your home more comfortable all year long. Installing a ceiling fan is an ideal one-day project for homeowners with little or no wiring experience. Most fans have pull switches that turn the unit off and on, and control fan speed. You can also install wall switches to control the fan (see Wiring Ceiling Fixtures with Switches, Related Projects).
|
1. Select a brace bar
If you don't have access from above, you'll need a ceiling fan support, known as a brace bar, which can be inserted from the room below. Typically, it consists of an adjustable bar installed between two joists.
|
Ceiling fan diagram
|
|
2. Test the assembly
Do a dry run of assembling the brace bar, ceiling box, and box bracket. Be sure you fully understand how the brace bar is fastened in place and how the box is attached. Follow the instructions that come with it. Once installed, these items are hard to remove.
|
|
|
3. Test-fit the bracket
Check that the fan support bracket fits and can be attached easily once the box is in place. Push out a ceiling box knockout (a tab covering a hole in the back or one of the sides), and install a cable clamp. Disassemble the brace bar, ceiling box, and box bracket.
|
|
|
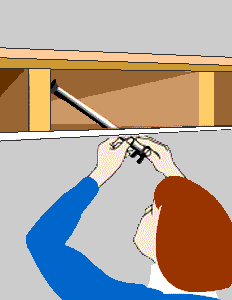
4. Position brace bar
Cut a hole in the ceiling about 5 inches in diameter (see Installing Boxes in Finished Space, Related Projects, for tips on locating it). Most brace bars have a screwlike fastener at each end that fixes the bar in place. Tip the bar through the hole, then center it over the hole, perpendicular to the joists.
|
|
|
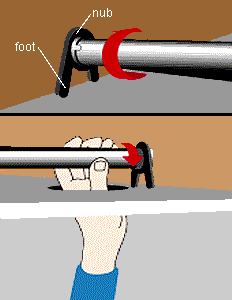
5. Fasten the bar
Turn the outermost piece of the brace bar until it locks into the nub. Continue turning until the first foot is fastened. Next, turn the innermost bar to fasten the other foot.
|
|
|
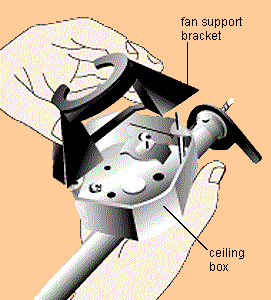
6. Attach the box
Pull wires into the receptacle box. Loosely fasten one side of box bracket, and position the bracket on the brace bar. Feed the second bracket bolt through the box, and fasten nuts on both of the bolts using a socket driver or pliers.
|
|
|
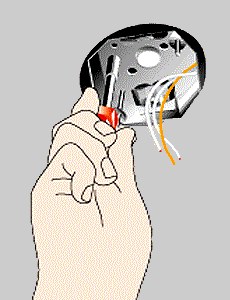
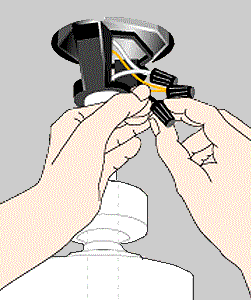
7. Wire the fan
Attach the fan support bracket and the down pipe. Connect the fan leads to the circuit wires using wire connectors. Simply attach white to white, black to black, and the ground wires to the green lead. Manufacturers usually provide instructions. Wire the fan following the instructions.
|
|
You'll have many different types of ceiling boxes and brace bars to choose from at your local hardware store or home center. Some are variations on the fan brace bar shown on these pages. Others are reinforced plastic or thick-gauge metal fixture boxes designed to support fans.
The types worth purchasing have two features in common: They are extra strong, and they attach by some means directly to the ceiling joists. Never install a fan bracket or fixture box that is supported only by the ceiling material.
If you have access from above, you can add in framing to support a heavy-duty ceiling box attached with general-purpose screws.
|
Chart: Clearances and Capacity
For safety--and to give the fan adequate space to effectively move air--use the clearances shown here. Select fan blades to suit the square footage of the room.
|
|