Introduction
Damaged or worn electrical plugs and cords pose the most common shock and fire hazards in the house. This article describes several common types of plugs and cords, and demonstrates how to replace them safely. Be sure that any plugs or cords that you replace are equivalent to the originals; ask your dealer if you are not sure which parts to select.
|
Types of plugs and cords
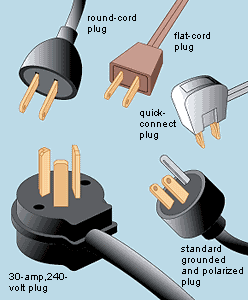
Common plugs
Standard grounded plugs have a third, round prong for grounding; the two flat prongs are polarized.
Appliances that use 240 volts require heavy-duty three-pronged plugs of various configurations. The one shown here is for a 30-amp, 240-volt dryer. In general, if a 240 volt plug requires replacement, you should buy a plug with the cord already attached.
|
|
|
Common cord types For flexibility, most cords have stranded, not solid, wire. Zip cord, so called because the two wires can be easily zipped apart, is for light duty. Use cords with 16-gauge wire for appliances pulling 15 amps or less and 12-gauge wire for 20 amps or less. For 240-volt appliances, use wire that is 10-gauge or thicker.
|
|

|
Replacing a round-cord plug
1. Prepare the new plug Snip off the old plug. Remove the cardboard cover from the new plug, and slide the snipped-off end of the cord through. Strip off 3 inches of outer insulation and about 1/2 inch of wire insulation. |
|

|
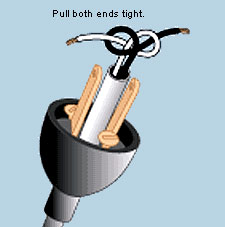
2. Tie Underwriters knot This special knot will ensure that tugging the cord won't loosen any electrical connections. Make the knot close to the end of the stripped outer insulation. |
|
|
3. Prepare the wire ends Twist the wire strands tight. With a pair of needle-nose pliers, shape clockwise hooks to wrap around the screw shafts. |
|
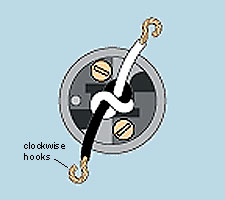
|
4. Connect the wires Hook the wires on the screw shafts (attach the black wire to the brass-colored screw), and tighten. Tuck in stray strands. |
|

|
5. Replace the cover Check to be sure all wires and strands are neatly inside the plug. Slip on the cardboard cover. |
|

|
Replacing a grounded round plug
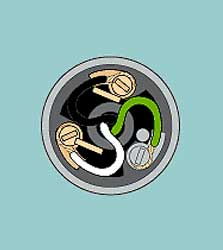
1. Wire the new plug Wiring a grounded plug is very similar to wiring a nongrounded type. It is critical, however, that you attach the green wire to the grounding blade.
Some plugs have a clamp that grips the cord where it enters the base. For these plugs, it is not necessary to tie an underwriters knot. Simply slide the plug onto the cord and strip about 1/2 inch of insulation from the ends of the three wires. Twist the strands tight, and use needle-nose pliers to form hooks. |
|

|
2. Attach the wires Attach the black and white wires to brass-colored terminals, and the green one to the silver-colored terminal. Tuck in any loose strands as you tighten the terminal screws. Tuck all the wires in place, tighten the cord clamp, and slip on the cardboard cover |
|
Keep a few quick-connect plugs on hand and you'll never again be tempted to put off replacing a faulty or questionable plug. Installing one is only slightly more difficult and time-consuming than changing a lightbulb. Replacing a standard flat-cord plug is more like doing actual electrical work, but it takes only a little more time.
|
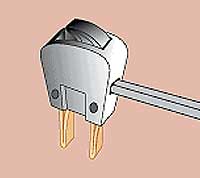
Attaching a quick-connect plug Snip off the old plug. Lift the lever on top of the new plug and insert the zip cord into the hole.
Closing the lever pierces and holds the wire. Push the lever firmly down and you're done. |
|
|
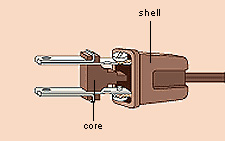
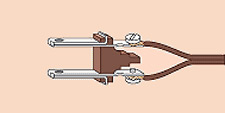
Replacing a flat-cord plug Snip the old plug off, and slip the shell onto the cord. Peel apart the wires, and strip away about 1/2 inch of insulation. Twist the strands tight with your fingers, and use needle-nose pliers to form hooks that will wrap most of the way around each screw.
Wrap the wires clockwise around the screw threads, and tighten the screws to secure the connection. Tuck in any loose strands.
Grasp the shell of the plug and push the core toward it until it snaps into place. Put your appliance back into service. |
|