Introduction
One of the easiest ways to enhance your home's electrical system is to install special switches. Wiring them is rarely much more difficult than installing a standard switch.
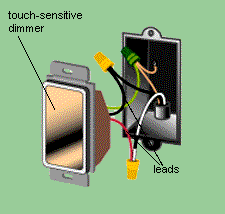
Choose from a wide variety of options. The single-pole dimmer (shown in this section), for instance, is touch-sensitive, like a modern elevator button. Touching its flush plate turns lights on and off. Holding a finger on it adjusts the light level. Even that minimal effort isn't necessary with the motion-sensitive switch. It turns on a light fixture whenever someone enters a room then stays on for a prescribed amount of time.
Be aware that some switches have limitations. For example, an ordinary dimmer can only handle up to 600 watts, so it may not be able to operate a chandelier. For higher-wattage fixtures, buy special dimmers able to handle 800, 1,000, or 1,500 watts. (For more information on these and other switches, see Choosing Switches, Related Projects.)
If you have ground wires, they all should be connected together in the box, no matter what kind of switch you are installing.
NOTE: Shut off the power before installing the switch.
|
Single-pole dimmer
Most dimmers have a set of leads, or short wires, instead of screw terminals. Hook up a single-pole dimmer as shown. Most dimmers are deeper than conventional switches, so you may have to rearrange wires in the box before you can fit one in. Don't force dimmers, because they crack easily. If there are too many wires, order a thin-profile unit.
|
|
|
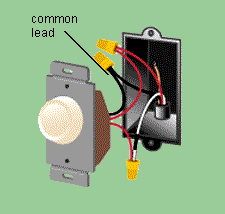
Three-way dimmer
Three-way dimmers have three hot leads. Before you remove the old switch, determine which is the common terminal--it will be printed on the switch body, and/or the screw will be darker-colored than the others. Hook the common wire to the new switch's common lead, and connect the other wires. (See also Wiring Three-Way Switches, Related Projects.)
|
|
|
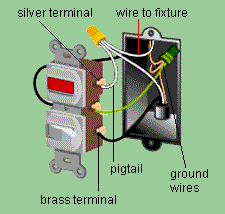
Pilot-light switch
This switch has a bulb that glows when its fixture is on. Connect the black feed wire to the brass terminal on the side that does not have a connecting tab. Pigtail two white wires, and connect them to the silver terminal. Connect the black wire that leads to the fixture to the terminal on the side with the connecting tab.
|
|
|
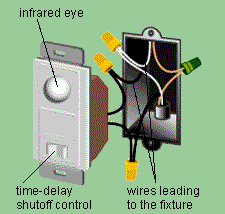
Motion-sensor switch
An infrared beam detects movement and turns on a light fixture. A time-delay feature lets you choose how long the light remains on. Connect the neutral wires to each other, not to the switch. Connect the black feed wire to one lead. To the other lead, attach the black wire that runs to the fixture.
|
|
|
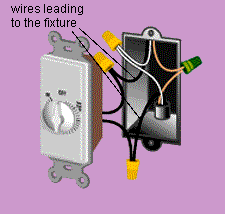
Time-delay switch
With this type of switch, you turn a spring-driven dial to set the switch so it will turn off a fixture after a delay ranging from 1 to 60 minutes. Connect the black leads to the black wires in the box, and connect the white wires together, not to the switch.
|
|
|
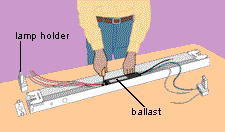
Fluorescent dimmer
Fluorescent dimmer switches connect in the same way as incandescent dimmers, but you must equip each lamp with a special ballast. Remove the fixture. Mark the wires with pieces of tape so you'll know where to refasten them. Remove the lamp holders and disconnect their wires by poking into the terminals with a nail or thin screwdriver. Remove the old ballast and install a new dimming ballast. Reconnect the lamp holders. Reinstall the fluorescent fixture. If more than one fluorescent light is connected to a dimmer switch, all the bulbs must be the same size and share the same ballast (for replacing a ballast, see Troubleshooting Fluorescent Fixtures, Related Projects).
|
|
|
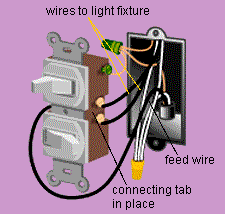
Double switch
This unit has two switches that fit into a single-switch space. Attach the feed wire to a terminal on the side with the connecting tab. (This tab enables the wire to supply power to both switches.) Connect the two wires that lead to the two fixtures to the terminals on the other side, and connect the white wires together, not to the switch.
|
|
|
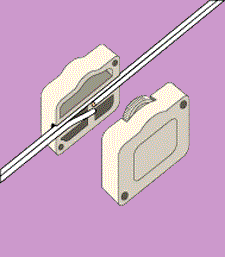
Cord dimmer
You can purchase in-line cord dimmers for lamps that do not have switches. Some, such as this one, automatically pierce the insulation when you put the unit together. Others require stripping the wires before assembling.
|
|